Blog Hop! Blog Hop! Blog Hop! Blog Hop!

Hello and welcome to my blog and Pennywise Arts annual Blog Hop! My projects featured here; the gardener's bag with goodies, and the floral bag with goodies both feature products from Pennywise Arts, which can be found here: www.pennywisearts.com . Pennywise arts is not only a wonderful source of glass microbeads and crafting products, but is also a great group of amazing, talented, and friendly people who can offer lots of advice and ideas on how to use microbeads, and just crafting in general.


gardener's bag

gardener's bag
spring is here people! Let's grow something!

Now Read this!! April 2011 Blog Hop!

My first "blog" candy project, aka ( blog hop prize) is a gardener's gift bag. Being the lover of all things Dollar Tree, I bought 2 of these gift bags for a dollar, and using the collage pictures from Pennywise Arts, I covered them in O'So sticky paperback tape from Pennywise Arts, cut them to size, and then covered the picture in cardstock, and stamped on the bag itself using a stamp from Stampin' Up. I then stamed the word Sweet on cardstock and covered it in the sticky tape, and then in Terra Cotta colored microbeads from Pennywise. I framed it with cardstock and scrapbooking paper, and then attached all the pieces with Mono adhesive. I put a bow of handkerchief ribbon on it an got springy, and filled it with assorted gardening goodies!

If you WOULD LIKE TO WIN THIS BAG, please leave a comment about it along with a way for me to notify you, if you have won!

I loved the first bag so much, I made another in bright yellow, using another collage picture from Pennywise Arts and covered it with O'So sticky tape and then with clear microbeads. I backed it with cardstock and then scrapbooking paper and applied it to the bag with Mono adhesive. I made a big bow with bright daisy ribbon and filled it with all sorts of flowery goodies!

If you WOULD LIKE TO WINT THIS BAg, please leave a comment about it along with a way for me to notify you if you have won!

To start the hop from the very beginning, please go to Pennywise Arts here: http://pennywisearts.blogspot.com/2011/04/yay-it-pwa-blog-hop-day.html to start your "hop" through the blogs and see some great art!

To continue on to the next artist go to :


http://gotasunsetinmyveins.blogspot.com

if any of these links do not appear to work please go to the next link. I also have a list of the links posted below. Thanks.

Thanks again for your support and participation in our hop!

Monday, April 18, 2011

Our lucky winners of the 2011 Pennywise Arts blog hop are......drumroll please!
Debbie and Theresa DW!!!! Congratulations ladies on your win! I know I had your address somewhere Theresa but cannot find it, if you could both e-mail me the address you would like your prizes mailed to I will be getting them out to you shortly! Thanks everyone for playing along and leaving your comments and congrats again to the lucky winners!!

Saturday, April 16, 2011

List of blog hop addresses

Hey everyone, if you want to start from the beginning and work your way through all the blogs, or skip around feel free to check them all out. This is the list of all the blogs on the hop:
Please do not forget to leave your comments on their blogs as well as mine. I will be giving away the 2 bags to randomly drawn winners. Please specify in your comment which bag you like and a form of contact to reach you if you have won!

Thursday, September 30, 2010

AND THE WINNER IS....

Julie! by random pick (from a cup with names in it) Julie is the winner! Congrats Julie.. now you have to e-mail me your likes, colors, design ideas etc. and I will be on my way to making my personalized gift for you!! I know you do AWESOME work so I will do my best to make it super special for you!

Saturday, September 11, 2010

Getting back into the crafty swing of things

Hello all, it has been so long since I've posted, I just can't believe it! Lots of illness (including the flu) this spring/summer along with lots of work has equaled not a lot of crafty time. I did however make a few items as part of my design team assigment for the Yahoo Group Pennywise Arts I belong to. It really got my creative juices flowing coming up with new and unique ways to use microbeads. I hope you enjoy the pictures of my items.

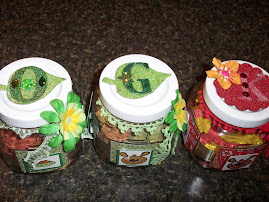
The jar idea seemed to take on a life of it's own as it inspired fellow members to make their own jars for different occassions, and I myself used the jar idea to make dog treat jars for myself and fellow coworkers. Everyone that works in our office has either a dog or cat and I thought it would be a cute and decorative way to display treats for our favorite little pals. I don't have a dog yet, but after our kitchen gets finished I am hoping to get a furry little critter for our family. The kids are so excited about that! On top of each jar I put a glittered letter for first letter of each of the pet's names. I was so surprised at how many medium sized dog bones I could fit inside! It was a lot of fun and I hope to use those fantastic little dollar jars for more projects. They are just blank slates for chocolates for a friend, cookies for the holidays, just about anywhere your imagination can take you.

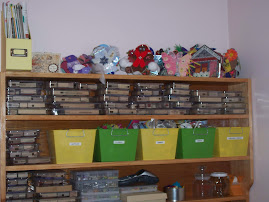
I am also posting some pics of my newly organized craft area. I wouldn't call it a craft room since it shares half of the room with the computer and printer desk, but I find that my little nook of space is just right now that I have everything in bins and at my fingertips. My husband made the shelving unit himself and it is just beautiful! I bought all the yellow and green bins at where else?? The Dollar Tree.. and I have the larger ones higher up labeled so I know what is where. This new set up also makes clean up streamlined,since I am no longer turning in circles wondering where in the world I am going to put things. Even though I still have items on my table I feel I have more work space just because I can take a bin down get what I want and then put it right back up. For about $15 dollars I have a new sense of pride in my craft area and a more relaxed atmosphere with storage.

I hope you enjoy the posting and the pics and that if you have been like me, sidetracked by illness, work, or everyday stress, that you are encouraged to get back to that well loved, ink-stained craft table and have a little fun!

Saturday, April 3, 2010

ATCs

I want to firstly thank everyone from the Pennywise Arts Blog Hop who left such wonderful comments on my "Friends" frame I made for the blog hop. The lucky winner of that frame was Sherrie Roberts! I hope she gets her package in the mail soon! It was such a blast participating in the hop I encourage others in our group to try it next time around if they didn't get a change to participate this time. It is amazing how many wonderfully talented people are in our group and I am awed at their talents every time I visit one of their blogs.

I recently made some new ATCs and thought I would put them up on the blog. I have been participating in the Pennywise Arts ATC (artist trading card) swap for about three years?!! (can it be that long?!) now and I just love it. ATCs are a great way to showcase smaller stamps or portions of larger stamps and of course all those great embellishments like brads, eyelets, buttons, ribbon etc. They can be individual works of art or multiples of the same idea. When I like a creation, card or ATC I tend to make them in multiples just because I am fond of the design and layout. Of course this makes for easier trading too, that way more swappers can get a chance to have the same ATC.

I recently used an idea I found in the April edition of Crafts 'n Things magazine page 59 about using a technique called Paint Scraping. Basically I took two colors of acrylic paint and used an old credit card to scrape the paint across a piece of heavy plain white cardstock. I alternated the direction and the colors. The first piece I tried I used blue and red and I think the blue was a little to dark to show the "scrapes", so the next piece I used yellow and red, which came out much more defined and bright. I really like the texture of the paper too. I created an ATC using the yellow and red paper and really felt it looked like a sunset! I found that my regular water-based ink did not seem to set as well however, and it took a couple of days for it to dry completely so I think the next ones I make I will use Staz-on ink which will definitely not smudge.

I also made a few ATCs with a large stamp of a woman holding pearls. I just love the stamp, but it was too long to fit onto the ATC, so I colored her in with markers and then I cut her in thirds (I keep thinking of that magic trick with the lady in the box lol).. I ended up using the first and third piece and leaving the middle piece out and using a piece of ribbon across the middle. She was then covered in sticky paper and clear microbeads.

I found this great bunch of zodiac art that turned out to be nearly the same size as an ATC, so I printed them and then cut them out, and blended many different colors of microbeads to adhere around them with sticky tape. It is so exciting to stumble across a stamp or image that works perfectly in ATC size (2-1/2 x 3-1/2 in.)


Amongst all of my cards and ATCs I found an extra of one of the baby shower invitations that I had made a few months ago for a co-worker of mine. I took a package of thank you invitations and then just covered them up. It was far less expensive to use something that was pre-cut and with it's own envelopes than to buy the cardstock, cut it all out, and then buy envelopes to match. I bought a box of 45-50 thank you cards with envelopes for around 10 dollars and then I used a background stamp in blue and green over the front. I then cut out individual letters spelling baby and then backed each letter with the opposite color. I popped them off the page with popping dots and then stamped the little infant feet for the middle piece. I used small bows of ribbon and glued them underneath. I was a lot of fun, but lots of work since I ended up making 45 of them in all!!

I really appreciate everyone who reads my blog and all of you who have become followers. This experience has been a great one and I hope as I learn more about creating a blog that I will be able to display my photos better. It is still a learning experience for now :)

Thursday, March 25, 2010

Pennywise Arts Blog Hop Contest!

Hi everyone and welcome to my blog! For the next 3 days (Friday the 26th through Sunday the 28th) I will participating in the Pennywise Arts Blog Hop. This is a "hop" where you begin by visiting http://pennywisearts.blogspot.com and then "hop" your way through each blog on the list there. Once you have hopped to each blog and left a comment on each site in honor of each of their works of art made especially for the blog hop, you end up back up at the Pennywise Arts blog where you will be entered to win a prize!

As a bonus, If you leave a comment on my blog I will enter your name into a drawing to win the blog art (or as we call it "blog candy") which is the Friendship Frame I made using glitter and Pennywise Arts Lettuce colored microbeads from www.pennywisearts.com

So remember you have until the end of this Sunday the 28th to leave your comment and be entered to win a prize. The next stop from my blog is http://stampersquest.com they have so much to share that they will be updating on Sunday with all new projects – so be sure to stop by there on Sunday and leave another comment! In the meantime, hop on by to Stephanie’s blog: http://mrsl-dramateach.blogspot.com/

Leave your comments on the next blog and the next and so on as many of our participants will be offering up prizes as well! Enjoy and have fun! Jen

Wednesday, March 3, 2010

New cards and ideas

I have been doing some new card making lately and decided to make different sized cards. Normally I take the Stampin' Up 8x10 cardstock and cut it right in half to make two cards of equal size. Recently I found a box of envelopes of varying sizes at my local Big Lots and it was a steal at only 1.50 so I snatched it up. I have been making cards to fit the new envelopes and it is really fun to see what you can come up with with a much larger or much smaller card. I found myself using stamps I hadn't used in quite a while and playing around a lot more.

I also had a thought last week that I would really like to write and encourage people to look beyond the craft store for the most obvious embellishments for their crafts. It is really amazing the things I have run across in places like The Dollar Tree, Big Lots and Home depot! When you start looking at things from a crafters point of view, everyday items take on a whole new meaning.

I had once bought a huge roll of foil tape at Home Depot for about 7 dollars, it is sticky with a backing on one side and shiny foil on the other. This makes a great vehicle for alcohol inks! You can cut the piece as large or small as you want and use on cards, ATCs, journals and the like.

The Dollar Tree is my favorite place to go when I am on the hunt for new items that will be used in a craft project and I don't have a lot to spend. Buttons, ribbon, artificial flowers, and even vellum and mullberry paper have been found there and of course it is always a dollar! Even things you wouldn't think of like sponges for painting, charms from keychains and bamboo placemats are all very useful and can be altered or cut to be used for several projects. I recently wandered the pen/paper isle in my local Dollar Tree and found amongst the school supplies these great big paper clips with heavy weight charms attached to them. I snatched up as many as I could being 4 paper clips for a dollar in hopes that they could be disassembled. I took them home and was pleased to find the charms held on only by a tiny dab of solder. I used my jewerly pliers and pulled off the charm from the paper clip. They can then be used on any project I wish with just a large glue dot or maybe some hot glue! I have found charms very expensive in the craft stores and I ended up making my own for a quarter a piece!! I took some pictures so I could show some examples of what I bought.

The biggest thing is not to discount any item that seems "worthless" as it has a potential all its own and sometimes it takes a while to find that perfect project to use it on, but you will be glad you saved it from a less than glamorous life as something like a paperclip!

Saturday, February 13, 2010

recent crafting


Well I have been struggling with a nasty virus lately and have not had tons of energy, but I have been wanting to get in some crafting for friends and family so I have been working on cards and some ATCs.

I have rediscovered a method I learned several years ago at a Stampin' Up workshop for using a ball of rubber bands to create a background effect. By rolling the ball of rubber bands over an ink pad you wet the ball of rubber bands and roll over your card stock in a random pattern creating a really cool effect that looks printed. You could use several different balls of bands and colors of ink to create something really special and unique. As always I try to make sure I incorporate my microbeads from Pennywise Arts into all of my paper crafts. I have found that I like not only to mix the colors of the beads together but I also like adding glitter as well. When using a strip of sticky tape you can make sure the glitter sticks by adding it first on random spots of the tape and then adding on your microbeads to the bare spots of tape. I tried it out on a card the other day and it came out really nice.

I don't consider myself a technique junkie, but I do like to mix it up now and then and surprise myself :) my standby is alcohol inks. You can use the same colors a hundred times and never come up with the same design on paper twice. I also love UTEE or ultra thick embossing enamel. I have burned myself so many times but it is worth the pain to see the shiny results! The crackled glass technique is always fun, creating random crackles and not knowing where they will end up, they should sell that stuff by the barrel :)